Wednesday, May 18, 2011
Final Drawing

It is also a good idea when you think you’ve finished or are getting near the end of a drawing to try looking at it in many ways. Getting the perspective of your picture in different light is a huge thing. Going from my dorm room to the class room made a world of difference. Not for the better. I am going to re-do my self portrait before I put it in my portfolio. That’s why it’s not in here. I thought I was getting better at drawing and started it a buuuuunch of times. Too bad it didn’t look like me.
A lesson I learned for drawings I do after this: always write the date on them! I forget what drawings I’ve done when and they’re all blending together. Some of them I remembered to date and write the amount of time in class we got to do them. Now I just need to remember to do it for all of them.
It was kind of sad to just leave Oliver behind in the classroom. After spending an entire semester together working hard on him, my creation is complete. I guess the next person who makes a manikin out of the same one I had will be kind of like a reincarnation of Ollie. What funny little things, those manikins. I thought it was really funny to see everyone’s standing together like a skeleton army. It even has a leader. Hmm.
May 2-6 – skull


The skull. Dun dun dun. Most beginner drawers, especially children start the body by drawing the head. Furthermore, they draw a big ol’ circle. It’s the right way to start, but now at a college level we know it is more complex than a simple sphere. We also know you should start with the ribcage and work your way around the body to the hips, legs, shoulders, arms, then the head.
I was pretty satisfied with my drawing of Rob on Friday. I realized that I work better if I don’t think super hard about the pose right away. The final product is more successful if I start by quickly sketching what I see (gesture drawing style) then going in with the exact angles and details. It’s easy to use vine charcoal when doing gesture drawings because going that quickly, you do not have to pull out an eraser each time you make a mistake, just swipe it away with your hand.
On this drawing, that’s what I did with the head and it ended up being almost the exact right size. I actually don’t think Amy looked at it to critique it. At first his hair kind of looked like a helmet on his head, but I thought about how hair is kind of a helmet to protect our head or at least keep the heat in. When I stepped back and focused on the body as a whole it did not look helmet like. That made me glad and so I left it.
I am also happy with the way his arms turned out. They are proportional to the rest of his body and his elbow hits at the right spot on his side. I did not make his hand just a regular ball or sausage fingers, but carefully arched the start of his fingers and kind of squared them off. I’d call it a success.
Eye


With the eye we learned it is crucial to remember it is a globe shape. It can easily be forgotten and drawn as an oval right away. There are three plane changes at the top of the eye and two on the bottom. When drawing Annie, at first I didn’t put in enough of the upper lid and Amy showed me how it should go. After putting in the line of the lid that covers part of the eye ball, the same shape is used to make the back line of the lid. The upper lid overlaps the bottom lid which is especially apparent at the corners. During our class, it is not necessary to draw in the eyelashes because they are distracting if you draw each individual one. It is fine to draw in the shape of the outer one on the top lid used as more of a shadow rather than a lash.
From the side, the eyeball is circular with a partial sphere where the cornea, iris, and pupil are located. In our drawings, we did not need to focus hardcore on the iris and pupil, just as long as the circular shape of the cornea was present.
The shadows on the eye ball can be compared to the earth and sun. The highlight on the eye follows the round direction of the lid. There is also a shadow below the eye where the hollow hole of the skeleton is underneath. When drawing, it is helpful to make landmarks on the face like where the plane changes are from the eye to cheekbone as well as the shape of the bottom of the cheek. Amy explained how the eye is in further than any of the rest of the face and to be sure we did not draw it sticking out. It may seem like a given, but it’s not, so it was a good point to make. After the shape of the eye is in place, you can easily follow the shape of the triangle at the top of the nose to lead into the brow. Similar to the lashes, it is not necessary to draw the eyebrows as hairs, rather a line indicating they exist.
April 25-29 – nose & lips


I will never look at another nose the same again. There are so many complex parts that I had never analyzed so closely before. There are many plane changes that you have to look carefully on each individual person because no nose is the same. Nostrils are particularly odd when you really think about them. Amy brought up a good point that instead of drawing an entire shape shape (like a sphere or a circle) as the nostrils, rather it looks better to draw a few not connected lines. It makes it much more realistic looking. I thought it was funny she made sure to tell us not to draw it looking like a pig.
In our lesson from Amy we learned the nostril stays on the bottom plane, which is usually shaded. Under the nose is the Philtrum or “love filter.” She said that’s probably her favorite part of the body and I would have to agree. It is underrated. It is often overlooked as people examine the facial features of another person. They usually focus on the eyes or smile passing right over the Philtrum.
Before, I never realized that each nose takes a downfall at the top near the eyes where it switches from bone to cartilage. Then following it upwards, a triangle shape makes up the area between the eyes. At the tip of each nose is a small sphere shape. This varies greatly from person to person. Both the size and whether the nose points up or down is unique to each individual. Analyzing features of the face this much makes me think about genetics and how interesting it is that we get genetics from our parents that make us look the way we do.
Sometimes when I would draw a nose, I couldn’t see both side planes of it, but resorted to the “draw what you know” tactic. Otherwise it looks a bit unfinished if you leave it totally off so putting just a hint of the shape helps it look more realistic. It is important to define the top plane because it makes the nose seem three dimensional standing off of the face. I sometimes find it hard to make my drawings look life like. Getting the right shapes is tricky too. I find it easiest to hold a pencil out in front of you and use it as an angle reference. I had not learned that technique until this year and it works super!
The upper lip is darker than the bottom lip because the lower lip faces up towards light. Both lips have a different thickness to them. The darkest point is the line between the lips and if you make the outsides too dark you will get the feeling of an unwanted expression. In resting stage, the lips curve downwards and some curl back up again at the edges. There is a very thin highlight above the top lip.
Feet


I have found feet a difficult part for me to draw accurately. During gesture drawings, we did not have to add them in as full shapes, rather lines to show they existed. This was great base work for fully adding them in later.
With feet, we learned about the plane changes and I found it helpful to draw contour lines indicating where these plane changes are. The next time I draw a foot I will put more value on it. Also, be sure to make the toes more square shaped to distinctively show the plane changes. In my opinion, adding feet to a human standing adds a lot to the drawing. It gives the sense of stability and that the figure is grounded.
About April 11 –Hand Skeleton

The skeleton of the hand is one of my favorite parts of the body. The different sections each have a different shape and they work together to accomplish crazy tasks. Tasks such as drawing, flossing, writing, holding a baby, eating are all very important things to be able to do. I liked how by looking at the skeleton we could see the exact shape of the bones. You don’t get that with the human hand. The shapes are unique and before this class, I never thought about how each section of bone is shaped a bit like an elongated figure eight.
The skeleton hand reminds me of my sister’s hands. In a good way, though. It comes from my grandma, they’re hands meant for piano playing kind of. My fingers are long too, but not as long as hers.
Amy helped me out by telling me to be sure to make the plane changes clear. It may seem a big blocky when you’re first drawing, but then if you stand back and examine it, it looks very realistic. Plus, if you add in some light shading to the sides, you can clearly see the difference.
It was nice that in the room there were individual bones of the hand we could look at as a reference. Being able to hold it and turn it around in your hand up close to see the plane changes helped a lot.
It would be interesting to look at the skeleton paws of say, a poodle and compare/ contrast the bones to that of a human. Even between a baboon and a human. They’re probably very similar. You have to wonder if gorilla hands with their big old sausage fingers have bigger bones than us.
How our hands grow from when we are babies is an interesting thought. I love baby hands they’re so chubby and cute. What tiny bones they must have. That makes me think of x-ray machines and how advanced technology is getting.
April 18-22 - Real hand

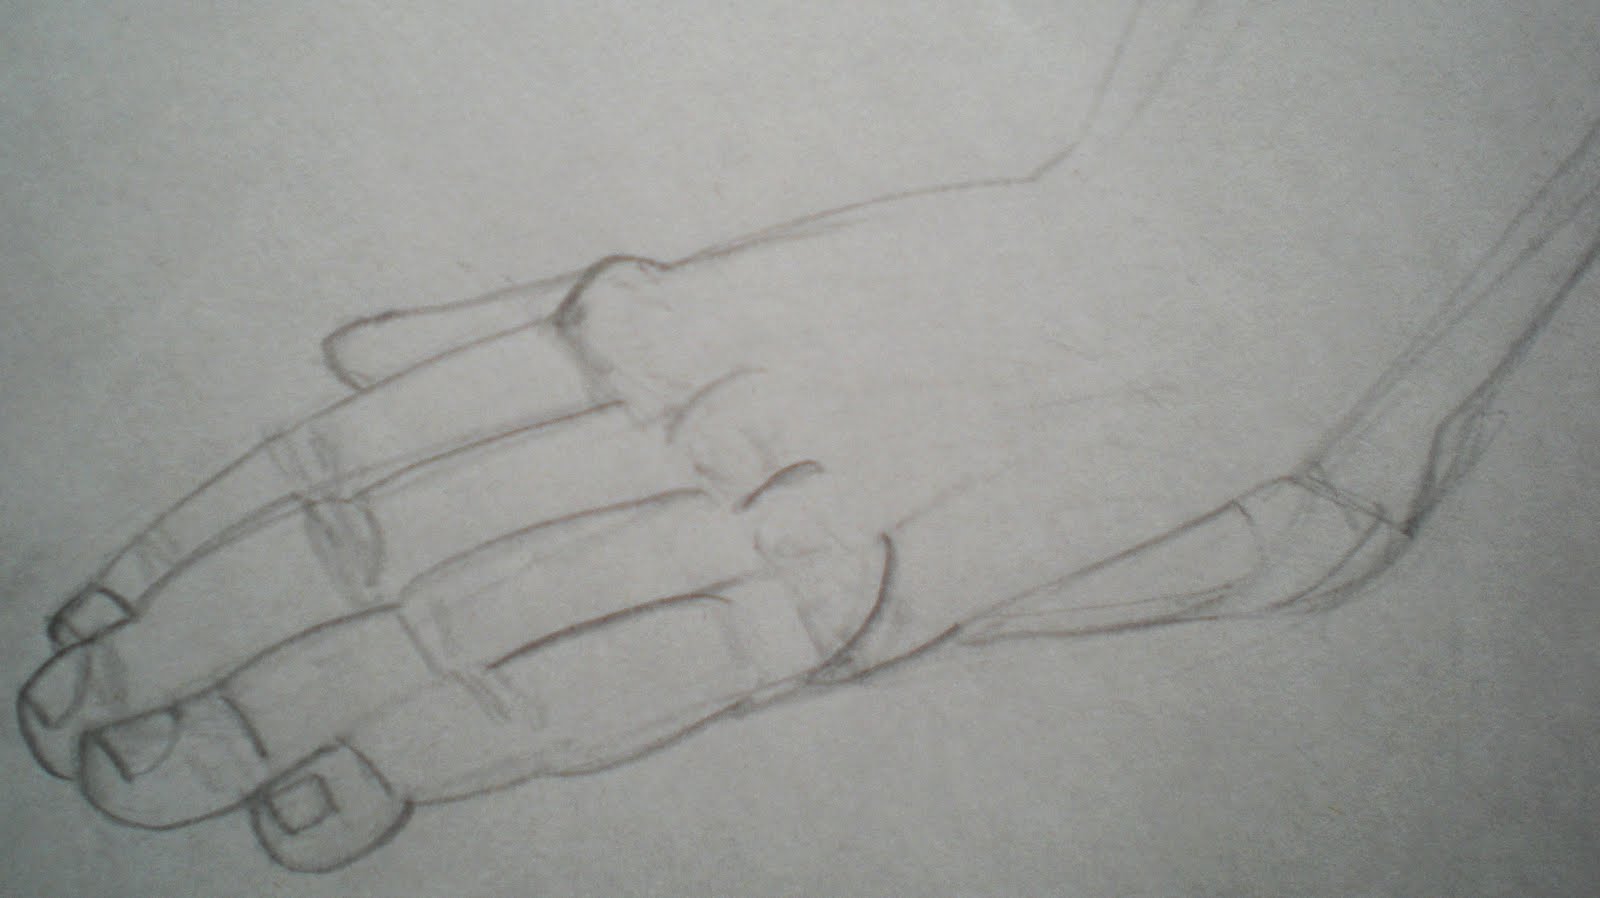
The first drawing of the hand I did looked like a robot hand instead of a human hand. I knew something was wrong with the fingers connecting, but had to ask Joelle, my neighbor, why she thought it looked like the hand of Optimus Prime. Once she showed me Amy’s example on the board had all of the fingers connecting more to a point near the wrist, I got it. The first day of drawing hands was not the most successful for me, but I kept trying and have gotten better at least.
This hand’s fingers might be a little long compared to the palm, but I blame Rob. ;) Just kidding! The models are great. Since his fingers were closer to me, I had tried to make the point of view relevant. I’ll keep working on hands.
I find it interesting that looking at a skeleton, the tips of the fingers are so pointy. Especially typing this up right now I can picture the bones tapping away on the keyboard. Kind of eerie... Halloween like. Next year I would like to have a little skeleton in my room for Halloween. Then I can remember all the parts from drawing! Although the fingers are so pointy, tendons and muscles in your fingers make the tips little pads.
Putting these hand tendons on our manikin sure was a lot of fun. Well, maybe not described as fun, but they are very thin pieces so rolling them out was kind of like Play-Doh snakes. Babysitting we used to do play-doh ALL the time! My mom even let us make homemade Play-Doh when we were little girls. Anyways, we rolled them out and the fingers have two layers of them. They connect all the way up the lower arm too. I had a little bit of trouble telling exactly where the book was saying the tendons go up to connect to the arm. Our books can be confusing so good thing Amy knows so much about the tendon locations!
March 28-April 1 – Sitting in Chair


We focused on the arms one class this week. It’s easy to get caught up in the idea of starting with the arms since that was the main focus of the lesson. I had to make sure to remember to start off by drawing the rib cage, then the legs, shoulders, then finally the arms. The muscles making up both sections on the arms surprised me a little. I didn’t think about how many overlap each other or how many muscles it really takes to reach for an object. It was especially apparent when doing the Manniken. I was debating whether or not to make the biceps body builder status, but decided against it because the arms would look foreign compared to the rest of the body and wouldn’t match up size wise. Maybe if someone had an unlimited amount of clay they could do that. I’m glad we don’t have to feed our manniken’s. I feel like Oliver would have a hearty appetite.
Arms really are a huge part of our daily lives. (Then again I don’t think you can say any part of the body is insignificant. They all play a huge role every day.) The fact that these things that seem like branches coming out of us can hold all of our weight to do a push-up or pull-up is so interesting.
Drawing proportions has become so much better for me! If you really just stop to take the time to look and analyze each piece in relation to the surrounding parts, it all fits together like a puzzle. The human body like a puzzle. I’ve never thought of that analogy before and just realized it really works. There are a bunch of small pieces that look kind of weird and alien like by themselves, but put them all together and what do you got? Bippity boppity boo… a human.
Amy corrected the angle of the elbow on this piece. It was slightly off. Also, I drew her head in lightly since I don’t really know how to get the shape right yet. The more practice, the better ya get!
Subscribe to:
Posts (Atom)